Flexible, Portable, & Improved Efficiency: Using Edge Computing to Create Portable AI Solutions
- Gouwa

- Dec 5, 2024
- 5 min read
Updated: May 26, 2025
A Visual Recognition Playground for Developers
With AI and computer vision evolving at warp speed, visual recognition has blasted into mainstream industries as a core application. From analyzing images and video streams to identifying objects or events in real time, this tech is a powerhouse in fields like security, transportation, automation, and healthcare. Automated detection, smart surveillance, and autonomous vehicles are just the tip of the iceberg, with demand surging for robust visual recognition systems.
Today, developers leverage visual recognition for tasks like face recognition, license plate identification, and object detection. These applications have exploded beyond traditional industries, branching into smart retail and smart homes, proving this tech is here to stay. Yet, for developers, the ultimate challenge lies in building these systems efficiently and scalably.
Enter edge computing platforms—the secret sauce for ultra-fast, low-latency visual recognition. By processing data locally, edge computing slashes transmission delays, delivers real-time responsiveness, and cranks up computational efficiency. For applications where every millisecond counts, edge computing is a game-changer.
Why Edge Computing Rocks for Visual Recognition:
- Real-time Responsiveness: Data processing happens locally, axing latency issues tied to cloud services.
- Reduced Bandwidth Use: Transmit only processed data, cutting down on bandwidth overhead.
- High Reliability: Local processing means no dependence on external servers, creating a more stable system.
These benefits make edge computing platforms indispensable for visual recognition projects. Developers get a compact, power-packed hardware system ready for image acquisition, AI algorithm execution, and results output.

DIY Visual Recognition System
We’re diving into a killer combo of hardware and software to help developers easily build portable, efficient visual recognition setups. The recipe? The Khadas VIM4, IMX415 camera, and TS050 touchscreen.
Think of it as your Swiss Army knife for AI dev—perfect for projects needing flexibility, portability, and high performance. Whether testing in fixed labs or dynamic environments, this system offers everything from rapid iteration to mobile monitoring.
What You’ll Need
Hardware
Khadas VIM4 SBC: With 3.2 TOPS NPU for AI firepower.
Khadas IMX415 Camera: 8 megapixel, autofocus, wide angle 8MP wide-angle lens, auto-focus, Sony sensor.
Khadas TS050 Touchscreen: 5-inch display, 1080 × 1920 resolution, multitouch.
3D printed Enclosure: A compact frame that houses all components securely.
Software
RetinaFace: An open-source, high-accuracy facial recognition app.
Other Accessories
New VIMs Heatsink (recommended): For dissipating heat from the VIM4 when in operation
3705 Cooling Fan (recommended): Ultra-quiet fan for forced convection of the heatsink
Passive VIM Heatsink (optional): For noiseless operation of the entire setup
USB keyboard (optional): used to input terminal commands into VIM4

Step 1: Assembly Time!
Building your visual recognition system is a breeze, thanks to a modular approach.
To conveniently combine the hardware components into a compact form, we designed a special 3D printed shell that can perfectly integrate the VIM4, IMX415 camera, TS050 display, and other components. In this way, users can not only quickly deploy the system in various locations, but also ensure stable component connections and good heat dissipation. More importantly, such a design ensures the portability of the system, making it suitable for various environments, including mobile monitoring and other application scenarios.
Tip: You can choose other cameras or screens according to your needs; however you will need to modify the 3D-printed CAD files accordingly.

Access our provided CAD files to 3D print a sleek enclosure, then follow our tutorial to assemble the components.


Tutorial on Connecting the Gear
Slot the screen into the enclosure (you may uncover the sticky tape for a permanent fit)
Fasten the camera into the enclosure (with two M2 × 5 screws)
Connect the screen and camera to VIM4 (via FPC cables)
Fasten VIM4 into the enclosure (with four M2 × 5 screws)
Attach the back cover to the enclosure (use three M2 × 8 self-tapping screws for a permanent fit)
Result? A compact, portable setup that’s easy to deploy anywhere.

Step 2: Software Magic
With hardware locked and loaded, it’s time to bring the system to life with software. The Khadas VIM4 runs AI algorithms locally, bypassing the cloud to ensure lightning-fast performance.
OS Installation
Boot into OOWOW and install Ubuntu on the VIM4’s eMMC for a stable operating system.


Enable Camera
The IMX415 camera is disabled by default. You need to enable it by configuring the overlay.env:
Edit the file /boot/dtb/amlogic/kvim4n.dtb.overlay.env, and add vim4n-imx415 to the fdt_overlays node:
$ cat /boot/dtb/amlogic/kvim4n.dtb.overlay.env fdt_overlays=vim4n-imx415$Note: You need sudo privileges to edit/boot/dtb/amlogic/kvim4n.dtb.overlay.env.
Add the node, save the changes, and then restart the system.
$ sync $ sudo reboot Step 3: Optimize the Setup
Orient the Display Horizontally
Because the 3d printed case was designed to be used horizontally, you will need to set Ubuntu to output the desktop in horizontal mode:
Log in to the system, the account and password are as follows:
Username: khadas (all lowercase)
Password: khadas (all lowercase)
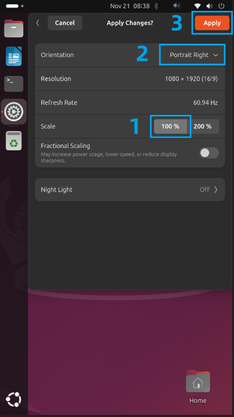
Set the display to landscape orientation: Open Settings > Displays > Select Scale 100% > Select Orientation as Portrait Right > Select Apply.
Click Keep Changes.


Set Screen to Always On
Open Settings > Power > Screen Blank and select Never.

Enable Automatic Login
Open Settings > System > Users, select Unlock, and turn on Automatic Login.

Step 4: Run RetinaFace
Instructions
Using the RetinaFace face detection application, we will collect data from the IMX415 camera and then use the NPU to perform face detection. The application identifies the key points of the face and then displays them in real time on the TS050 touchscreen.
Download Source
Download the NPU application code (RetinaFace) to a specified directory, such as the ~/code directory, as follows:
$ mkdir ~/code $ cd ~/code $ tar xvzf retinaface_cap.tgz Compile Source Code
Before compiling, you need to install the necessary packages as follows:
$ sudo apt update $ sudo apt install -y libopencv-dev python3-opencv cmake After installing the dependent packages, enter the application’s source directory and compile it by utilising the following commands:
$ cd retinaface_cap $ mkdir build && cd build $ cmake ../ $ make -j4 $ ls retinaface retinaface Run the Application
Enter the build directory: ~/code/retinaface_cap/build and run the Demo as follows:
$ cd ~/code/retinaface_cap/build $ ./retinaface -m ../data/retinaface_int8.adla -t mipi -h 1080 -w 1920
After successfully executing the app, you can see the face detection screen, as follows:

Exit the App
Long press the application icon and select Quit to exit.

Tip: This tutorial only uses the RetinaFace app as an example to demonstrate one of many NPU applications. For more ideas of NPU usage, please refer to Khadas Docs.
Summary
Congrats! You’ve just built a portable, edge-powered visual recognition system that’s lightyears ahead of traditional setups. With tools like the VIM4 and its modular components, developers can reimagine real-time applications in security, healthcare, and beyond.

Edge computing is the future of visual recognition, delivering blazing-fast processing and reliable performance. Whether it’s mobile monitoring, AI testing, or smart industry deployment, this setup is your gateway to building the next big thing.
Have questions? Leave them in the comments and we will answer them as soon as possible. You can also head to Khadas Forum to start a discussion for more inspiration and help.
Share with Us
Before we end this blog, we'd also like to mention that we always love to see what you've built! If you have completed this entire tutorial, please share your project with our community on the Khadas Forum. Whether it is a quick photograph or a detailed write-up, your unique creation could inspire others. If you run into any issues along the way, you can also seek help from the Khadas Community. Get your creative juices flowing!
What’s Next?
Stay tuned for more blog posts diving into AI, IoT, and audio tech. Got project ideas? Hit us up at ideas@khadas.com or share on the Khadas Forum. Let’s innovate together! 🚀
Warmly,
Khadas Team


Comments